this thread is a tiny dive into 3D armatures and rigging, specifically control rigs and how they interact with the animator and game engines. featuring a little bow rig that took less time to setup than it took to write this thread.
ive been bogged down with studies recently. they arent particularly serious, its not like im getting graded for these studies and the deadlines are all self-imposed, but its been making me feel a little claustrophobic nonetheless.
(not an advert btw)
one of these courses is a 3D rigging course for Blender made by Pierrick Picaut, its called AOER2 (The Art of Effective Rigging 2). for those interested in making rigs manually for pretty much any purpose, from characters to machinery, i could not recommend anything else to learn from.
aoer2 demo video (shows off the rigs the course teaches with a short movie)
aoer2 course trailer
Picaut’s YT channel is a goldmine of information when it comes to blender animation/rigging. a good number of his tutorials are cut from his paid courses, so you can see if you like his teaching style before buying anything. the actual courses contain a lot more theory and step-by-step resources that the videos tend to gloss over.
ive been meaning to write a full review, but im just roughly halfway through the course (the final chapter is like a third of the course length).
Ive also been taking a couple of drawing courses and working on 2D art, so ill probably write about that in another thread and show you guys how thats been going.
Its a little weird though, because despite the fact that I know i’m getting better and smarter from these courses, I cant help but feel like im stagnating. It doesn’t feel like im working on anything, and ive put most of my projects on pause. I think theres some sort of paradox here, this mismatch between reality and my mind?
So I made this simple little bow model in my frustration, vaguely based on a compound bow design, and put together a quick and dirty rig in the span of like an hour.
(theres another slightly longer demo video on my twitter)
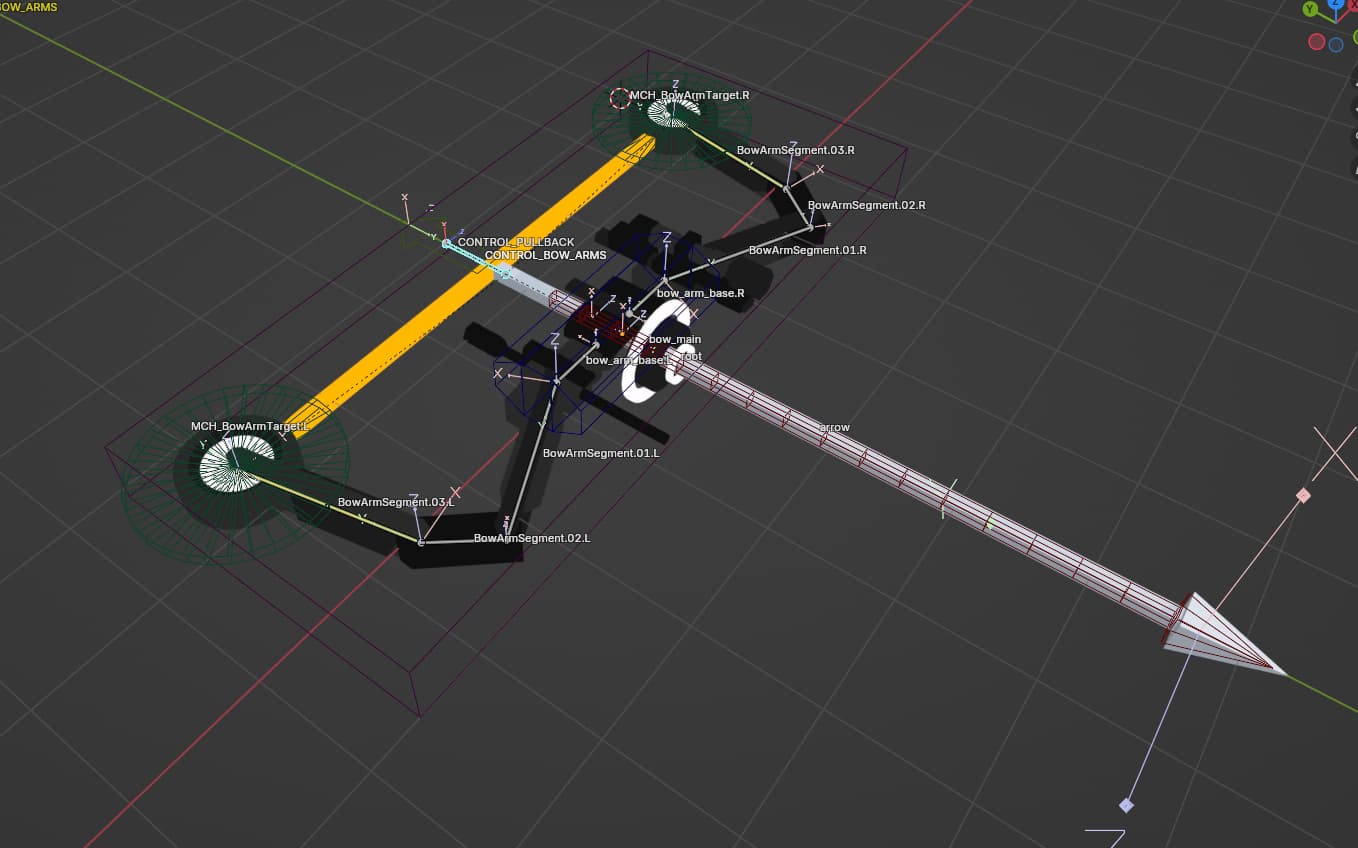
as a quick little breakdown, this rig is making use of IK constraints for the bow arms, and a Copy Location Constraint set to 20% influence.
IK constraints, or inverse kinematics, allow you to manipulate multiple bones by controlling a single bone target. This is great for positional-based animation and linear movements. This is compared to the default setting, forward kinematics, where you manually control each bone in a chain by rotating them individually.
IK is commonly used on arms and legs, and in video games is used to match 3D characters’ feet to the ground on uneven surfaces and stairs. It can also be used to have characters pick up items or otherwise interact with the world as an essential part of procedural animation. IK in engine is a little different than IK in baked animation or control rigs, like what i’ve got here.
TL;DR - IK is good for Positions and automation, FK is good for manual rotations (and is the default)
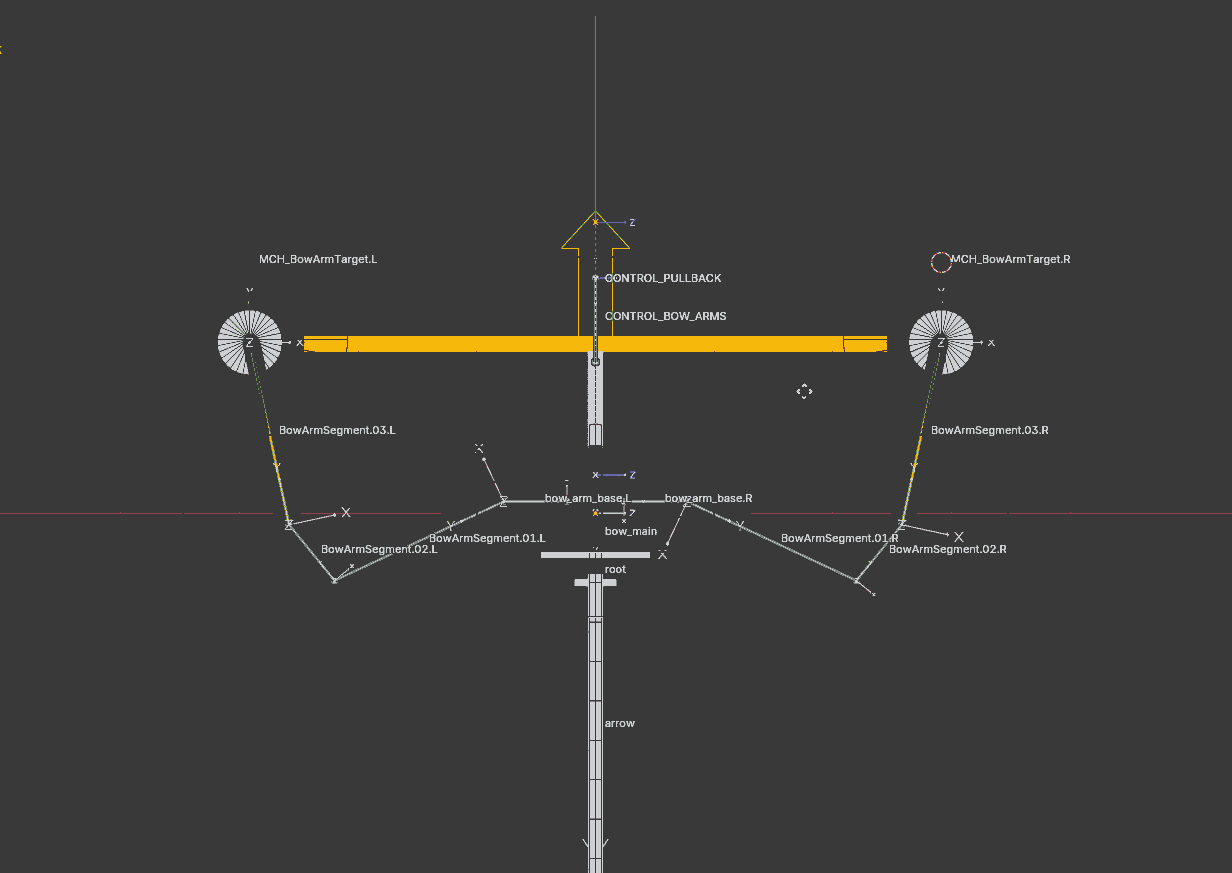
I use IK on the 3 Bow Arm Segments. So all I need to do is move the “MCH_BoneArmTarget”, and the IK system will automatically bend all the bow arm segments to match its position.
While I have access to controlling the "MCH_BoneArmTarget"s, I only really need to manipulate this “CONTROL_PULLBACK” bone, which is that green little arrow in in the center of the bowstring.

profile view of the bow rig
Those "MCH_BoneArmTarget"s have a Copy Location Constraint, set to ~20% influence. Note that it’s also using Local Space. The inversion along the Y axis is only because the bones were oriented opposite of each other, for no reason in particular.
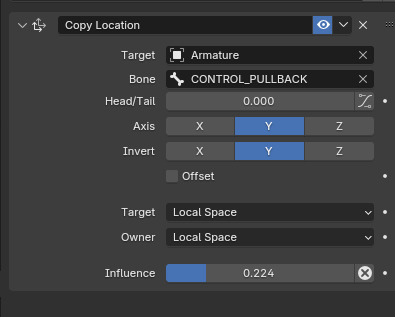
The 20% influence is important. If they were directly children of “Control_Pullback”, then they would constantly match the same offset position. I wanted to mimic the tension of a physical bow, so instead it resists the movement slightly.
In this above GIF, you can see on the left the 20% influence, while the right side has been adjusted to have 100% influence, completely following the arrow bone.
All of this movement is occurring through the use of a singular bone. greatly increasing the efficiency for the animator. I did leave in a few other bones to allow some more precise control just in-case an animator needed it, but I should add more in the future. This system was more of a sketch, a proof of concept.
The bowstring was handled through a very simple weight setup.

The middle point of the bowstring was weighted to the “Control_PullBack” bone, and the other two ends were weighted to the target bones on the side. This allows it to be attached to both the pull-back point and the physical anchors that it would be stuck to in a real life bow. I considered using dedicated bowstring bones, potentially allowing some more control and variation, but I figured that it would be unnecessary this time around.
Game Engines and Rigs
Now this system of IK constraints is, ironically, constrained to Blender. This mechanism is part of a Control Rig, designed to be used as a tool in an animators workflow. But in the game development pipeline, these IK constraints are nominal. Constraints don’t export across programs (generally), specifically when it comes to working in game engines.
So if you wanted to create animations in engine, or procedurally setup animations in engine, you would need to recreate an IK system with your own tools. Unity has the optional Animation Rigging Package which allows you to create Rigs on pre-existing skeletons, Unreal has its own built-in solutions, and Godot (from what ive heard) doesnt have reliable support for this. Unreal’s definitely the best for this, as animating in-engine has the best support out there, and it also comes with the most features. It also has the best built in tools for viewing bones imo and their animation graph system is also a lot more powerful than unitys.
An animator would use this Control Rig inside of their animation software (blender in this case) and then save these animation clips and export them to an engine. In this process, the animation constraints are exempt from the file and the bone movements are baked. This means that the movement you see, constraints in all, is recorded. The animation no longer requires the constraints to function. You can manually bake as well and remove constraints as you see fit, as long as the deforming bones remain unaltered.
Professional practice is to remove any control bones and only export deforming bones, but its not exactly necessary. Unity for example will recognize animations belonging to other armatures. As long as the armatures share identical bone names, it’ll copy over the animation data. ignoring any missing bones or extra bones. So extra IK system bones can get ignored, and any other mechanisms made outside of the game engine. This only works for the generic rig setting however, humanoid rigs have more specific rules and expectations to make their features possible. I generally only use generic rigs inside of unity.
So hopefully this thread was decently informative, if theres any questions this mightve left I can explain any of them here. Thanks for reading this little dive into the world of rigging and animation, a lot of these tasks are fairly isolated from public knowledge, so I thought this would be interesting to share. This really is just the surface level here, there are tons of different systems you can build to improve your animation skills, along with just making the animators life way easier.
I personally think that understanding rigs on a deeper level has made me a better animator at large, and I’d definitely recommend learning how these things work for any other skeletal animators. Understanding your tools and knowing how to make the most of them is just a pretty good way to get better at any skill, i think.